Anatomy of a Diamond Ring
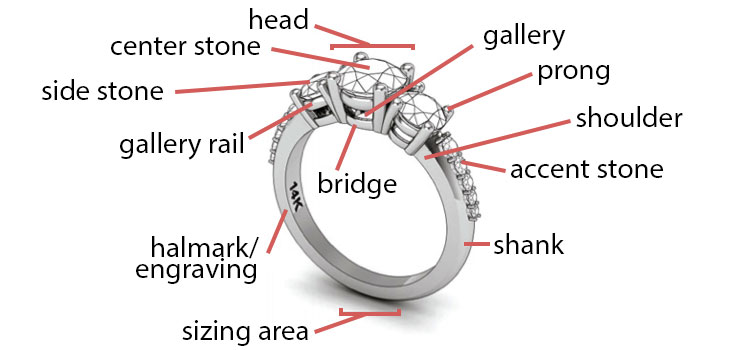
The most important part of the ring is the center stone, so we’ve already got that covered. For the prongs, the most common are 4-prong or 6-prong settings. I will discuss more about how to choose the number of prongs in the next tutorial along with how to choose a metal for the setting. For now I just want to point out that the type of metal of the shank is engraved onto the ring but it is possible for the head of the ring to be a different metal to that of the shank so you should make sure before you confirm your order.
A diamond can be set high to make it look bigger when you look at it from face-up because the diamond is effectively closer to your eyes. For poorly cut diamonds, an additional benefit of setting high is that light can reflect off of the setting and enter the diamond from the pavilion, which can hide light leakage. This means it is even more important to get a well-cut diamond if you’re looking to set a diamond low or in a rubbed in setting like a bezel or a pendant.
The benefit of a diamond that is set low is that it will look bigger to other people looking at your diamond from an angle because more of the diamond will be visible to them. This trade-off is balancing act and in my opinion you should just have it set so that it looks good to you in the profile view. I personally like settings where it just hides the culet from being visible in the profile view.
The gallery of the setting also is the part of the ring that is between the crown of the diamond and the shank, and the shank is what the body of the ring is called. A popular type of gallery is a cathedral and I will be showing you an example in a bit. Some people have their center diamond set in a basket and I’ve found that this covers up a lot of the diamond from the side. This won’t affect the light performance of a well-cut diamond because light is returned from the crown of the diamond. In the same way, a bezel set diamond won’t have any effect on a well-cut diamond.
Now let me take you through some of the more popular types of settings.
Solitaire
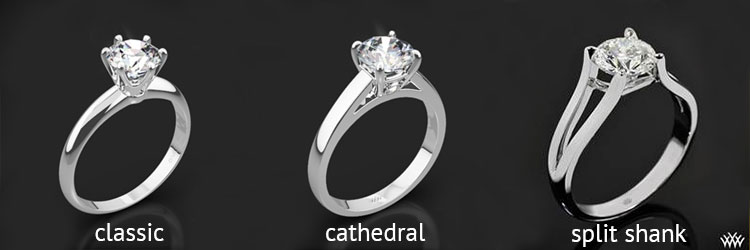
A solitaire ring simply means that there is a single diamond. One of the best known and most sought after solitaire ring is the classic Tiffany style that has six prongs. But Tiffany & Co will not sell you the setting by itself nor set a diamond that is not purchased from them. For this reason, many jewellers now offer Tiffany replicas. One of the most talked about replica is the Vatche U-113 that retails for $1,900 in the platinum version. Don’t worry, you can certainly find much cheaper replicas that are also of very good quality. The benefits of a solitaire ring are that it is simple, elegant, unimposing, and timeless. It is also easy to clean, maintain, and re-size. The solitaire is versatile and apart from the classic style, you can find variations such as having a cathedral setting where the gallery is designed like a church cathedral. You can also find different types of shanks like a comfort fit where shank is rounded or a knife-edge that has sharper edges but may appear sleeker. You can also get split shank rings where the shank is split into two.
Pavé
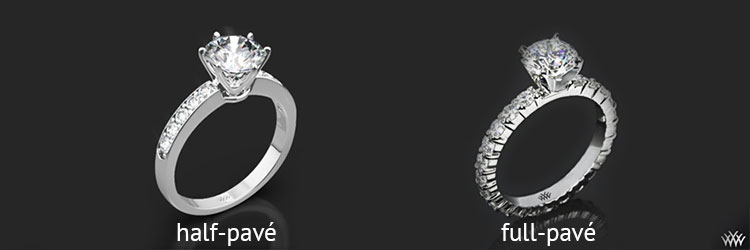
Pavé (“Pav-eh”) is French for ‘paved’ meaning that the diamonds are set into the ring like the paving cobblestones on a pavement. The classic French style has been adapted to create many different stylish versions of the pavé and now the term is generally used to describe any ring with small diamonds that are set in it. You can have a full-pavé or a half-pavé, and there is also what is known as ‘micro-pavé’. Micro-pavé rings are usually hand-made under a microscope because the diamonds are so tiny and the ring will be made up of several rows of these diamonds.
The benefit of pavé is that the diamonds hide most of the metal. Remember from previous tutorials where I mention that if you prefer a whiter and brighter band, then you should look for full-cut diamonds in the pavé, and if you prefer a fiery band then it may be worthwhile to see if you can find a pavé with eight-cut diamonds.
The disadvantage of a pavé is that it is difficult to clean, as you can’t get under the diamond easily. One way to clean a pavé is to use an ultrasonic cleaner, but you must be careful because ultrasonic cleaners have been known to cause pavé diamonds to fall out. The problem is you may not even notice if a diamond has fallen out because the diamonds are so small. Another disadvantage is that you cannot resize a full-pavé.
Channel
Unlike the pavé, a channel ring has diamonds that are suspended inside a channel instead of held together with prongs. Like a pavé, the underside of the diamond is difficult to clean. This is why in my opinion, straight-edged diamonds are more suited to this style where there won’t be gaps for dirt to get trapped.
The benefit of a channel setting is that the diamonds will be very secure and there is very little chance of them falling out. As an additional benefit, the girdles of the diamonds are protected so there is also less risk of damage from chipping. There is also some leeway in terms of resizing here. What you should look out for is that the edges of the setting are straight and that the diamonds are tightly packed together.
Halo
A Halo setting looks like a vintage ring but the circle of pavé diamonds surrounding a center stone has only become popular more recently. The center stone can be set with prongs or bezel set. The advantage of a bezel set is that the crown of the diamond sits flushly with the bezel and surrounding halo. When you have a bezel set diamond, it is even more important to have a diamond with superior light performance to ensure that the setting does not interfere with the light return.
The halo setting is used to create the effect of a larger diamond. The halo setting gives you plenty of options in terms of combinations of center stone shapes and halo. Also, you can take advantage of the small diamonds in the halo to mix up different types of scintillation in your diamond. For example you can have big bold colourful flashes of fire coming off the center stone while the halo will generally return bright white light.
Tension
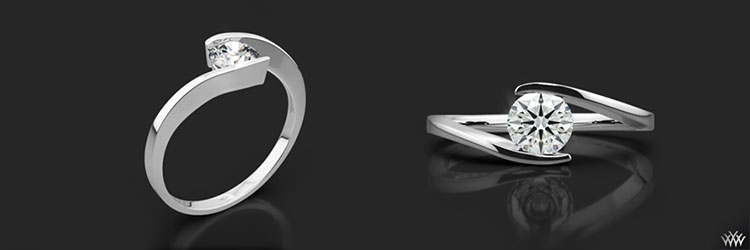
Tension settings are novel creations that are very fashionable. The idea behind a tension setting is that it uses pressure rather than prongs to hold the diamond in the ring. Because of its hardness, the diamond can safely withstand the pressure that is exerted to keep it in place. There are actually groves that the diamond will sit on in order to keep it from shifting.
Nevertheless, tension settings have to be set extremely carefully to ensure an even distribution of pressure so that the diamond doesn’t fracture along a cleavage plane. One disadvantage to the tension setting is that it cannot be resized and this is why you will find that most jewellers will only have the setting made after you purchase it.
Side-stones
Most commonly in a three stone style, the side-stones can also be in other shapes such as pears, baguettes, etc. The side stones may not even be diamond. One thing to be aware of when picking a side-stone setting is that the side-stones will affect the optics of the center stone. Diamonds with less than perfect optics may be enhanced by the side-stones and diamonds with H&A optics may have unexpected behavior when paired with side-stones. Another thing to be careful of is the color of the side stones. In general, you will want to stay within one or two color grades with the center stone.
Conclusion
For some people, a diamond ring setting can be more important than the diamond itself. For a guy looking for a setting, choosing the right setting can be extremely nerve-racking as most of us are in unchartered territory. I am a fashion hopeless so I was lucky that my fiancé loves the simplicity of the classic solitaire.
This tutorial has shown you the different types of settings and some of their pros and cons. If I’ve missed anything please let me know by leaving a comment. If you’ve enjoyed this please stay tuned for the next tutorial where I will be discussing some of the practical considerations when picking out settings in general.


